Chapter 19 – Creating Custom Instruments and Tunings
The TuneLings App version 0.68 introduces the ability to easily create Custom Instruments and Tunings.
The App comes with a set of built-in “Default Instruments”, such as 6-String Guitar, Ukuleles, Bass Guitars, Mandolin, and so forth, in typical standard tunings. But when you want an instrument or tuning that’s not already available, you can create (almost) anything you can imagine, and use your Custom Instrument just like any other, including creating chords and palettes for it in the Chord Manager.
Every Custom Instrument is created for a specific TuneLing, and becomes a part of it, so you need never worry that the user won’t have it. You can also copy and paste instrument definitions between TuneLings, in case you use the instrument in more than one song.
To create a Custom Instrument or Tuning:
Click on any part of a TuneLing (in the Studio) to select it: its Overview, a Channel, or a View – it doesn’t matter which. (As long as the TuneLing’s name is displayed above the audio time display, it’s active.)
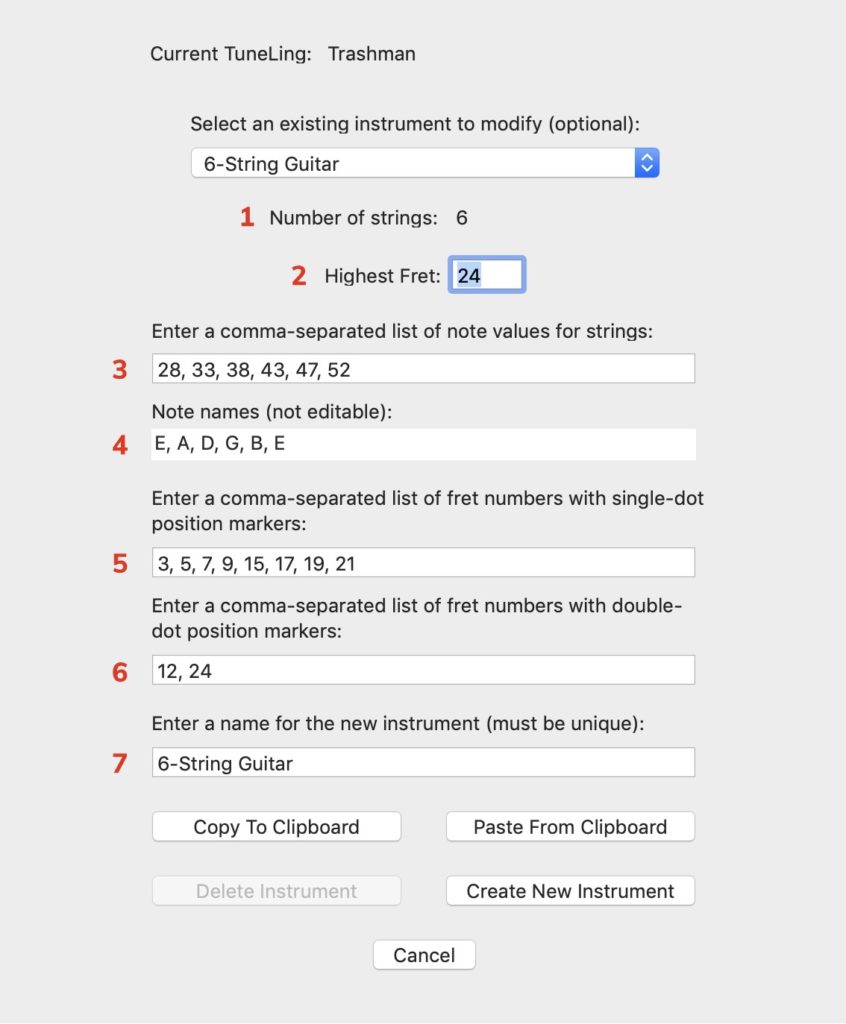
Select Create New Instrument Or Tuning from the Edit Menu (it won’t be visible if you don’t have a TuneLing selected). This will bring up the Instrument Creator window, as shown below. Essentially, you create a new instrument by filling out the form.
You can then select any existing instrument from the popup menu as a starting point for your new instrument or tuning. The popup will show all default instruments, and any Custom Instruments that already exist for this TuneLing. Selecting one will fill in the form with the details of the chosen instrument.
You can then edit the items in the form to create your desired result. The meanings of each item are as follows:
(See the red numbers in the illustration, corresponding to each of these items:)
- Number of strings: this is not editable, it’s automatically updated whenever you modify the list of string values.
- Highest Fret: the total number of frets. The acceptable range of frets is 1 to 24.
- The Note Values: this is a comma-separated list of the notes played by each open string, from left to right (typically low pitch to high), when you visualize the (right-handed) instrument, held vertically, with the bridge at the bottom. The low E String of a standard guitar has a value of 28, and 1 = one semi-tone. This is very easy to understand when you select an existing instrument as a starting point. (See the example below!)
- The Note Names: the notes in standard musical terms (A-G). This is automatically generated when you change the Note Values, to confirm your intent.
- The list of frets which show a single-dot position marker on the screen. There’s rarely a reason to change this, but you can.
- The list of frets which show a double-dot position marker. Again, there’s rarely a reason to change this.
- The name for the Instrument – the name must be unique within each TuneLing.

Example:
You want an open tuning for guitar, simply by tuning both E strings down to D. Just do the following in the Instrument Creator window:
- From the popup menu near the top of the window, select 6-String Guitar.
- Edit the note numbers: change the Low E from 28 to 26, and the High E from 52 to 50. (Lowering each by two semi-tones.)
- Type Tab or Return to move to the next editable field. Notice that the note names change from E, A, D, G, B, E to D, A, D, G, B, D. You can leave the position marker fret choices alone.
- Click or Tab over to the name field, and enter a new name for the Instrument.
- Click the Create New Instrument button. From now on this Instrument will be available in this TuneLing. You’ll see it in every Instrument popup menu (Chord Manager, creating channels, etc.), as long as you’re using this TuneLing.
To copy a Custom Instrument from TuneLing A to TuneLing B:
- Select TuneLing A, and bring up the Instrument Creator window.
- Select the Instrument you want to copy from the popup menu.
- Click the Copy To Clipboard button.
- Click Cancel to close the window.
- Select TuneLing B, and bring up the Instrument Creator window again.
- Click the Paste From Clipboard button. Make sure the copied Instrument is what you expect, or make any desired changes. You can keep the same name if you like, because it’s now in a different TuneLing.
- Click the Create New Instrument button. Done!
To delete a Custom Instrument from a TuneLing:
- Ensure that you are not using the Custom Instrument in any Instrument Channels.
- Select the Instrument you want to delete from the popup menu.
- If the Instrument is NOT assigned to any channels, the Delete Instrument button will be active, and you can click it.